Magic School Bus Halloween Costumes

For Halloween this year, I had a grand plan for our little family to go as characters from the Magic School Bus – I would be Mrs. Frizzle, Eddie could be the school bus, and Eve (our dog) could be Liz the chameleon. As it turns out, Eddie was not willing to wear a big cardboard school bus, and our dog doesn’t like wearing anything, so I only really went all out on my costume. But I love it, and since I ended up making the bigger stars/planets/suns removable, I think I will get some extra use out of it <3

Mrs. Frizzle and Magic School Bus Halloween Costumes

I made the dress out of some blue fabric with lighter blue and glittery silver stars. The original plan was to permanently attach the plants/moons/suns to the dress, but once I had the dress made I decided I wanted to be able to wear it without the appliques in the future, so I went about trying to find a fusible wash-away webbing, which was surprisingly difficult, and most products that came close were surprisingly expensive (~$20).

diy mrs. frizzle costume

I couldn’t find anything at jo-ann’s or even online, and so ended up using a glue stick like this one for less than $2 that says it will wash out. It goes on pretty soft and takes a while to form a good bond. It does stick well if you let it dry completely without messing with it, though. I wore it all afternoon/evening on Saturday for a party that involved plenty of moving,  twirling, and sitting, and only had one piece come off. Others peeled slightly at the edges, but I’ve just put more glue on the edges and re-glued the one piece that came off and I expect to be good to go for Halloween – Eddie and I have a class together on Thursday, and we plan on wearing our costumes :).

solar system appliques

For the dress, I used Butterick 5678 for the button-down top, then cropped it and added a partial circle skirt (using some fun geometry to maximize the ammount of a circle I could get from one piece of fabric – yay math!). The extra shapes (suns, planets, moons, big stars) are all cut out of other fun fabrics.

DIY Blue Pettiskirt

I wanted a flouncy skirt, so I also made a double-layer four-tier pettiskirt out of some matching tulle. I think the one comment I got the most about my dress was how I made the skirt big and poofy – guys and girls were both impressed.

Mrs. Frizzle costume accessories - Liz and sparkly shoes

As for accessories, I sewed a chameleon beanie baby onto my shoulder as Liz, made some cover-button earrings out of my dress fabric, and got some sparkletastic shoes from target (which I have already gotten plenty of use from outside of my costume)

Magic School Bus Costume/Shirt

Since Eddie wasn’t completely into having a big costume, he just got a t-shirt with an iron-on transfer. I used siser easyweed heat transfer from expressions vinyl. I just got a design from the silhouette online store, tweaked it to be a ‘magic’ school bus, and ironed it onto a yellow t-shirt. I think if I let him be batman next year, he may let me make him a real costume. Side note: Expressions Vinyl was great – they shipped super fast and had amazing customer service! They also have a handy list on their website that gives you settings for cutting each vinyl on a silhouette and cricket machine – which worked great for me. They’re also going to have a huge ‘cyber monday’ sale, but on November 18, so I’m totally going to stock up on some vinyl and such then.

Halloween Decorations

Yes, I know it is November 3. I’ve been pretty busy lately, but I still wanted to share some of my Halloween decorations, even if it is already after Halloween.

Ever since Eddie and I moved into our house (more than two years ago!) I’ve been wanting to decorate for holidays, but keep thinking to myself ‘I don’t have time for [upcoming holiday], I’ll just start making stuff for [next holiday]’. Well, this year Eddie and I kind of got volunteered to host our church small group Halloween party, so I decided this would be the holiday to start decorating!

Our first project was putting a floating shelf in our living room. I had an Ikea Lack shelf sitting around that I’d used in my previous apartment. We installed it over our TV (about 18″ over the top of the TV because I want to be able to use it for stockings!) by putting two of the screws into a stud and installing the other 8 screws with drywall anchors. I’m really excited about using this in the future as our general holiday/seasonal decoration spot even if I don’t have time to decorate the rest of our main living/eating area.

Ikea Lack Shelf Halloween Mantle
The glass vases and candles are mostly leftover from our wedding. The orange candle has a really cool texture, and is from Ikea as well, as is the black lantern. There are two tea lights that I wrapped with some of my washi tape from downtown tape, and the mini pumpkins are from a local pumpkin patch that is run by the A&M Habitat for Humanity. I made the ‘Happy Halloween’ bunting by just cutting out the letters from card stock (the font is called Haettenschweiler) with my Cricut and threading them with some orange embroidery floss. I love the shadow behind them – it was much easier to see in person.

Halloween decorations

And why, yes, there is a penguin on my Halloween ‘mantle’. If you don’t know already, I have a minor obsession with penguins. There are dozens of them all around our house, so when I realized that I had several with the perfect colors for my Halloween decorations (black, orange, and white), I couldn’t resist adding one.

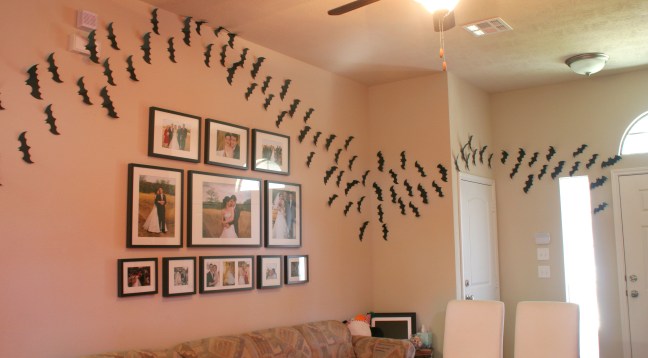
Paper Bats Halloween Decor

One of my favorite projects was this wall of bats Eddie and I cut out. I saw this idea on Made ages ago, and have been wanting to try it since then. We just cut them out of cardstock (didn’t use up a pack of 50 8.5×11″ sheets) while watching tv a couple nights, and then I taped them to our wall with scotch tape. When I first taped them up, I noticed that the ones with small loops of tape fell down by the next morning – but once I replaced those and started doing the rest with big loops of tape (as big as would fit on the backs), they stayed up fine and have been up for about a week now with no more casualties. We cut them out in two sizes, and you can get my templates as a pdf by clicking this link: Bat Templates. We folded the paper in half (hot-dog style, not hamburger), and were able to fit two of the bigger and four of the smaller bats from each piece of card stock.

Yarn Spider Web

As a last minute project on the day of Halloween, I decided to decorate our front door since we didn’t have much going on on our porch. I got some white yarn, and put up the ‘spokes’ first with some duck tape on the sides of the door (which you can see in the picture below). Then I took longish pieces of yarn, and wrapped them around the spokes going outwards to make a web.

Halloween Yarn Spiderweb

Another area I decorated was this open area between our kitchen and the living room (it’s actually open – I just put up a black cloth behind it for that picture so you could see the ghost better). Eddie even got me halloween colored flowers!

spray starch cheesecloth ghost

The main piece was a super awesome cheesecloth ghost using this tutorial. It just involved making a form out of a wine bottle, a 6″ styrofoam ball, and a coat hanger.

cheesecloth halloween ghost

I put this form on a towel on my counter, then draped the cheesecloth over it and sprayed it with starch. I let it dry (without using a hair dryer – I wasn’t in a rush, and the hair dryer moved the cheesecloth too much), then sprayed and let it dry again a few hours later. At this point, it was stiff enough that I could carefully peel it off of my form and it stood on its own! To finish it off, I just glued on some black felt circles for eyes. I really like how the cheesecloth puddles at the bottom then hangs over the edge. Here’s a picture to show how see through he is:

Cheesecloth Ghost

The little pumpkin/spider there is hard to see in the picture because of our dark counters, but here’s a better picture:

Mini Pumpkin Spider

It’s another one of the mini pumpkins from the pumpkin patch, but I used a tool like to make a spot for a tea light. I then poked holes in his side with a safety pin, and then put in pipe cleaners for legs. To finish him off, I hot glued on a couple of googly eyes. The tea lights are the ones from our living room shelf – just a closer view of their cute washi tape wrappers.

Jack-O-Lantern Chandelier Decorations

Another of my favorite projects were these cute chandelier magnets I made for the new chandelier in our kitchen (we got the Ikea Lerdal). The jack-o-/anterns are from a string of Halloween twinkle lights I got on clearance, and they’re attached to the beads with the tops from those round Christmas tree ornaments. They’re attached to the chandelier with magnetic jewelry clasps. I’m planning on doing some more for Christmas and I’ll do a tutorial on how I made them then, but I got the idea from here.

Whew! After typing that all up, it sure sounds like a lot of work, but they were almost all quick and inexpensive projects I did in the week or so before Halloween. Maybe I’ll get around to putting up my Christmas projects before Christmas? We’ll see. I’ve already made an awesome tree skirt and a couple ornaments, because Christmas is my very favorite holiday and I’ve been set on at least starting to decorate for Christmas this year.